


0x02. Driving Proxmox with an AI agent over MCP
0x00. Intro
If you run Proxmox VE, you know the drill: clicking through the web UI to spin up yet another container gets old fast, and shell scripts age badly. So I tried something different — letting an AI agent drive Proxmox directly.
The glue is MCP — the Model Context Protocol. In plain terms, MCP is a standard way to hand an LLM a menu of “tools” (functions it can call) plus a transport to call them over; the model picks a tool, fills in the arguments, and gets a result back. There is a community server, ProxmoxMCP-Plus, that wraps the Proxmox API as exactly such tools (get_vms, create_container, clone_vm, execute_container_command, and so on). Connect a client like Claude Code or OpenCode to it, and the agent can list nodes, create LXC containers, run commands inside them — the whole lifecycle.
A bit of vocabulary up front, so the rest reads easily:
- LXC / CT — a Linux container on Proxmox: a lightweight, isolated Linux userspace that shares the host kernel (cheaper than a full VM). An unprivileged CT maps its root to a non-root user on the host, for safety.
- Bearer token — a long random secret sent in an HTTP
Authorizationheader; whoever holds it is “authorized”. Think of it as a password for an API.
This post is a generic, reproducible how-to: how to deploy and secure the MCP server, how to connect a client to it, and a small demo of driving a container’s lifecycle from a prompt. Everything below was tested on a Debian 13 host with ProxmoxMCP-Plus v0.5.8. All IP addresses are examples on a private LAN (192.168.x.x) — substitute your own.
A note on what this is and isn’t: handing an LLM the keys to your hypervisor is exactly as dangerous as it sounds. The whole design below is about keeping that under control — a least-privilege API token, a localhost-only server, a bearer-token proxy in front, and an audit-only command policy.
0x01. Architecture
The server isn’t reachable from the network directly. There are three layers, each with its own authentication:
┌─────────────────────┐     HTTP + Bearer Token      ┌───────────────────────┐
│  AI Agent / Client  │ ──────────────────────────── │  Caddy (:8443)        │
│  (Claude / OpenCode)│                              │  - Token validation   │
└─────────────────────┘                              │  - reverse proxy      │
                                                     └──────────┬────────────┘
                                                                │ http://127.0.0.1:8000
                                                     ┌──────────▼────────────┐
                                                     │  ProxmoxMCP-Plus      │
                                                     │  - Streamable HTTP    │
                                                     │  - localhost only     │
                                                     └──────────┬────────────┘
                                                                │ HTTPS (verify_ssl=false)
                                                     ┌──────────▼────────────┐
                                                     │  Proxmox VE API       │
                                                     │  (self-signed cert)   │
                                                     └───────────────────────┘
The three security layers:
- Caddy validates a Bearer token and rejects anything unauthenticated.
- ProxmoxMCP-Plus only listens on
127.0.0.1:8000— it is never directly reachable from the network. - Proxmox authenticates the server with its own API token, completely separate from the MCP bearer token.
The MCP server itself runs as a small LXC container or VM (Debian 13, 1 vCPU / 1 GB is plenty). In the examples below it lives at 192.168.1.10 and talks to the Proxmox API at 192.168.1.2:8006.
Step 1 — install ProxmoxMCP-Plus
On the MCP host (a plain Debian 13 box), install Python and clone the app into /opt/ProxmoxMCP-Plus. Note curl and git — they are not on a minimal Debian image by default:
apt update
apt install -y python3 python3-venv python3-pip git curl

# uv is a fast Python package manager; install it and pick it up in PATH
curl -LsSf https://astral.sh/uv/install.sh | sh
source ~/.bashrc

# Get ProxmoxMCP-Plus
cd /opt
git clone https://github.com/RekklesNA/ProxmoxMCP-Plus.git
cd ProxmoxMCP-Plus
uv venv
uv pip install -e ".[dev]"
Then a systemd unit at /etc/systemd/system/proxmox-mcp.service so it starts on boot and restarts on failure:
# /etc/systemd/system/proxmox-mcp.service
cat > /etc/systemd/system/proxmox-mcp.service << 'EOF'
[Unit]
Description=Proxmox MCP Server (ProxmoxMCP-Plus)
After=network-online.target
Wants=network-online.target

[Service]
Type=simple
User=root
WorkingDirectory=/opt/ProxmoxMCP-Plus
Environment="PROXMOX_MCP_CONFIG=/opt/ProxmoxMCP-Plus/proxmox-config/config.json"
Environment="PYTHONPATH=/opt/ProxmoxMCP-Plus/src"
ExecStart=/opt/ProxmoxMCP-Plus/.venv/bin/python -m proxmox_mcp.server
Restart=on-failure
RestartSec=5

[Install]
WantedBy=multi-user.target
EOF

systemctl daemon-reload
systemctl enable proxmox-mcp.service
Step 2 — the MCP server config
ProxmoxMCP-Plus is driven by a single config file — /opt/ProxmoxMCP-Plus/proxmox-config/config.json (this is the path the systemd unit above points PROXMOX_MCP_CONFIG at). The parts that matter:
{
    "proxmox": {
        "host": "192.168.1.2",
        "port": 8006,
        "verify_ssl": false,
        "service": "PVE"
    },
    "auth": {
        "user": "mcp@pve",
        "token_name": "claude",
        "token_value": "<PROXMOX_API_TOKEN>"
    },
    "mcp": {
        "host": "127.0.0.1",
        "port": 8000,
        "transport": "STREAMABLE"
    },
    "security": {
        "dev_mode": true
    },
    "command_policy": {
        "mode": "audit_only",
        "deny_patterns": [
            "(^|\\s)rm\\s+-rf(\\s|$)",
            ":\\(\\)\\{:\\|:\\&\\};:"
        ]
    }
}
A few non-obvious choices:
| Setting | Value | Why |
|---|---|---|
mcp.host | 127.0.0.1 | Only reachable via the Caddy proxy, not from the network |
mcp.transport | STREAMABLE | The modern MCP transport (replaces deprecated SSE) |
proxmox.verify_ssl | false | Proxmox ships a self-signed cert by default |
security.dev_mode | true | Required before the app will accept verify_ssl: false |
command_policy.mode | audit_only | Logs commands but doesn’t block; a deny-list still kills rm -rf / fork bombs |
Step 3 — the Proxmox API token
The auth block above references a Proxmox API token. ProxmoxMCP-Plus needs an Administrator role with privilege separation off — PVEAdmin is not enough, because it lacks Sys.Modify, which container/VM creation requires:
# On the Proxmox host:
pveum user add mcp@pve
pveum acl modify / --users mcp@pve --roles Administrator
pveum user token add mcp@pve claude -privsep 0
# privsep=0 → the token inherits the user's permissions
Proxmox prints the token secret exactly once. Drop that value into auth.token_value in config.json (use your real value where the example shows <PROXMOX_API_TOKEN>), then start the service:
systemctl start proxmox-mcp.service
ss -tlnp | grep 8000        # expect: LISTEN 127.0.0.1:8000  (localhost only)
Step 4 — Caddy: the bearer-token gate
Caddy (a small, modern web server / reverse proxy) sits in front and does exactly two things — terminate TLS and check the token. Install it from the official repo:
apt install -y debian-keyring debian-archive-keyring apt-transport-https curl
curl -1sLf 'https://dl.cloudsmith.io/public/caddy/stable/gpg.key' \
  | gpg --dearmor -o /usr/share/keyrings/caddy-stable-archive-keyring.gpg
curl -1sLf 'https://dl.cloudsmith.io/public/caddy/stable/debian.deb.txt' \
  | tee /etc/apt/sources.list.d/caddy-stable.list
apt update
apt install -y caddy
For an internal network a self-signed certificate is fine — generate the certificate into /etc/caddy/mcp.crt and its private key into /etc/caddy/mcp.key, valid for the server’s IP (use your real address in place of 192.168.1.10):
# writes /etc/caddy/mcp.crt (certificate) and /etc/caddy/mcp.key (private key)
openssl req -x509 -newkey ec -pkeyopt ec_paramgen_curve:prime256v1 \
  -days 3650 -nodes \
  -keyout /etc/caddy/mcp.key -out /etc/caddy/mcp.crt \
  -subj '/CN=mcp-server' \
  -addext 'subjectAltName=IP:192.168.1.10,IP:127.0.0.1,DNS:localhost'
chown caddy:caddy /etc/caddy/mcp.key /etc/caddy/mcp.crt
chmod 640 /etc/caddy/mcp.key
Then the Caddyfile itself, at /etc/caddy/Caddyfile:
# /etc/caddy/Caddyfile
:8443 {
	tls /etc/caddy/mcp.crt /etc/caddy/mcp.key

	@unauthorized {
		not header Authorization "Bearer {env.MCP_TOKEN}"
	}
	respond @unauthorized 401 {
		body "Unauthorized"
		close
	}

	reverse_proxy 127.0.0.1:8000 {
		header_up Host 127.0.0.1:8000
	}
}
The token is just 32 random bytes, stored in /etc/caddy/mcp_token, then exported into Caddy through the systemd environment file /etc/caddy/mcp_env:
# token → /etc/caddy/mcp_token ; env file → /etc/caddy/mcp_env
openssl rand -hex 32 > /etc/caddy/mcp_token
chmod 600 /etc/caddy/mcp_token
echo "MCP_TOKEN=$(cat /etc/caddy/mcp_token)" > /etc/caddy/mcp_env
chmod 600 /etc/caddy/mcp_env
Tell systemd to load that env file via a drop-in override at /etc/systemd/system/caddy.service.d/override.conf, then start Caddy:
# /etc/systemd/system/caddy.service.d/override.conf
mkdir -p /etc/systemd/system/caddy.service.d
cat > /etc/systemd/system/caddy.service.d/override.conf << 'EOF'
[Service]
EnvironmentFile=/etc/caddy/mcp_env
EOF
systemctl daemon-reload
systemctl enable --now caddy
That header_up Host 127.0.0.1:8000 line is not cosmetic. The MCP Python SDK (v1.24+) has DNS-rebinding protection: bound to 127.0.0.1, it rejects any request whose Host header isn’t localhost/127.0.0.1. Without the rewrite, Caddy forwards the client’s original Host (e.g. 192.168.1.10:8443) and the server answers 421 Misdirected Request. Rewriting the header to what the server expects fixes it.
A quick sanity check from the server itself:
# Without the token — should be rejected:
curl -sk https://127.0.0.1:8443/mcp
# Unauthorized

# With the token — 406 means "auth passed, now send proper MCP headers":
curl -sk -H "Authorization: Bearer $(cat /etc/caddy/mcp_token)" https://127.0.0.1:8443/mcp
0x02. Connecting a client
The server speaks Streamable HTTP behind the bearer token, so any MCP client that supports remote HTTP servers can use it. Below are the two I use: Claude Code and OpenCode. In both, the URL points at the Caddy port (8443) and the token goes in an Authorization: Bearer header.
Claude Code
Claude Code reads MCP servers from a .mcp.json in the project root (for a machine-wide server, use the global ~/.claude.json instead). Mine is deliberately tiny — the token comes from an environment variable so it never lands in the file:
{
  "mcpServers": {
    "proxmox": {
      "type": "http",
      "url": "https://192.168.1.10:8443/mcp",
      "headers": {
        "Authorization": "Bearer ${PROXMOX_MCP_TOKEN}"
      }
    }
  }
}
OpenCode
OpenCode reads its config from opencode.jsonc (Linux/macOS: ~/.config/opencode/opencode.jsonc; Windows: C:\Users\<USERNAME>\.config\opencode\opencode.jsonc). Add an mcp block of type remote:
// ~/.config/opencode/opencode.jsonc
// (Windows: C:\Users\<USERNAME>\.config\opencode\opencode.jsonc)
{
  "mcp": {
    "proxmox": {
      "type": "remote",
      "url": "https://192.168.1.10:8443/mcp",
      "enabled": true,
      "headers": {
        "Authorization": "Bearer <MCP_TOKEN>"
      }
    }
  }
}
Tip: rather than pasting the token into the file, OpenCode can read it from the environment — set the header to "Bearer {env:MCP_TOKEN}" and export MCP_TOKEN in your shell.
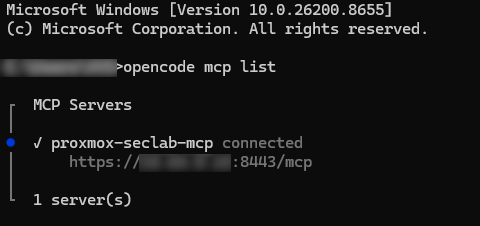
Restart OpenCode (it caches MCP connections on startup) and verify from the CLI:
opencode mcp list
# Should show: proxmox connected
The self-signed-cert wrinkle (both clients)
Claude Code and OpenCode are both built on Node.js, and Node strictly validates TLS by default — there’s no per-server insecure flag. With a self-signed cert the workaround is the Node environment variable that disables cert validation for that process:
# Windows (persistent, User scope)
[Environment]::SetEnvironmentVariable("NODE_TLS_REJECT_UNAUTHORIZED", "0", "User")
# Linux/macOS — add to ~/.bashrc / ~/.zshrc
export NODE_TLS_REJECT_UNAUTHORIZED=0
This disables Node’s TLS validation globally for that user, so on an internet-facing box it would be a bad idea. On an internal/trusted network it’s an acceptable trade-off. (If you’d rather not touch Node at all, Caddy can also run plain HTTP on :8443; the bearer token still gates access, the traffic is just unencrypted. Or, with a real domain, switch to a CA-signed cert and drop the env var entirely.)
After setting that, restart the client and the server shows up connected.
0x03. The tools the agent gets
Once connected, the agent sees the Proxmox API as a catalogue of typed tools. The ones I leaned on most:
| Tool | What it does |
|---|---|
get_nodes, get_cluster_status, get_node_status | Cluster / node health |
get_storage | List storage pools and their types |
get_vms, get_containers | Inventory of VMs and CTs |
create_container, create_vm | Provision new CT / VM |
clone_vm | Clone a template into a fresh VM |
start_container / stop_container, start_vm / stop_vm | Power management |
delete_container, delete_vm | Tear down a CT / VM |
execute_container_command | Run a command inside a CT (via pct exec over SSH to the host) |
update_container_resources | Resize CPU / RAM / disk |
create_snapshot, rollback_snapshot, create_backup | Snapshots and backups |
download_iso, list_templates | ISO / template management |
execute_container_command is the one that turns this from “an inventory API” into “an agent that can actually build things”. It doesn’t go through the Proxmox API — the MCP server SSHes to the Proxmox host and runs pct exec inside the target container. So the MCP host holds an SSH key whose public half is in the Proxmox host’s authorized_keys:
# On the MCP host
ssh-keygen -t ed25519 -f /root/.ssh/id_ed25519 -N ''
cat /root/.ssh/id_ed25519.pub   # → append to the Proxmox host's authorized_keys
That host-SSH path is what lets the agent not just create a container, but log into it and configure it end to end.
0x04. Driving Proxmox through MCP — a quick demo
With the server connected, you drive everything from a chat prompt: “create a small Debian container, start it, then tear it down.” The agent translates that into MCP tool calls. Here’s a neutral, reproducible walkthrough using throwaway values — VMID 9000, hostname demo-ct. (The tool-call notation below is illustrative of the arguments each tool takes; the agent fills these in for you.)
Create a sample container:
create_container(
  node='<PROXMOX_NODE>',
  vmid='9000',
  ostemplate='local:vztmpl/debian-13-standard_13.1-2_amd64.tar.zst',
  hostname='demo-ct',
  cores=1,
  memory=512,
  disk_size=8,
  storage='local-lvm',
  network_bridge='vmbr0',
  start_after_create=false,
  onboot=false
)
Start, then stop it:
start_container(node='<PROXMOX_NODE>', vmid='9000')
stop_container(node='<PROXMOX_NODE>', vmid='9000')
Each call returns a small status object — roughly, the VMID and its new run state — so the agent can confirm the step before moving on. A get_containers call afterwards shows demo-ct in the inventory with its current status.
Delete it when you’re done — no leftovers:
delete_container(node='<PROXMOX_NODE>', vmid='9000')
The VM lifecycle mirrors this exactly with the VM-flavoured tools: create_vm, start_vm, stop_vm, delete_vm (plus clone_vm to stamp a new VM out of a template). Same pattern — create, power on, power off, destroy — driven entirely through the secured MCP endpoint.
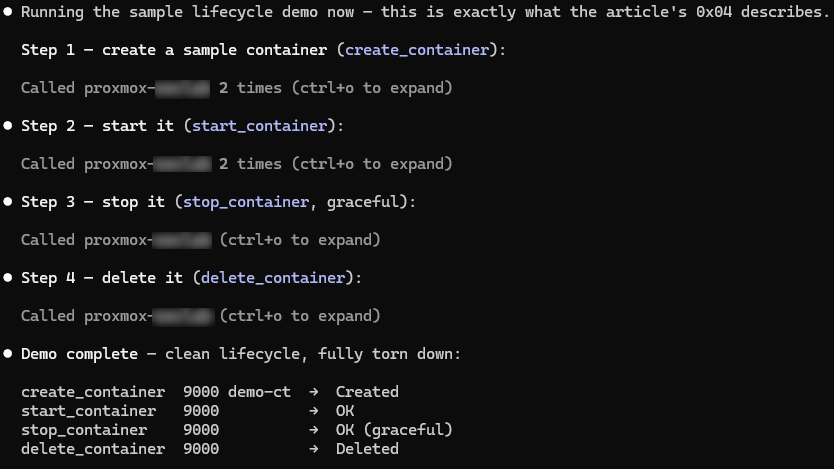
That’s the whole loop: a prompt in the client, typed tool calls out to Proxmox, a sample container created and cleaned up — without touching the web UI or SSHing into the host yourself.
0x05. Wrap-up
Putting an AI agent in front of Proxmox via MCP turns a pile of manual UI clicks into a conversation: “create a Debian CT, start it, tear it down.” The agent does the legwork; you keep the architecture decisions and the security boundaries.
Feels like — “that’s it? what’s the big deal?” — but no: you can now put the full weight of an AI behind standing servers up from scratch. The trick is to explain to the AI precisely what you want, and to always have a way to automatically verify what actually comes out the other end. Same as with programming — you don’t just say “write me a sort function,” you also say “and write the test cases to check it, covering every edge case you can think of”… (from there let your imagination run — but that’s a topic for another post).
Security: the boundaries are the whole point. The MCP server is localhost-only, behind a bearer-token proxy, using a dedicated least-privilege Proxmox token, with an audit-only command policy logging everything. That’s the minimum I’d want before letting any automated thing touch a hypervisor.
Thanks for reading this far. If you’re going to try the same thing: least-privilege token, localhost bind, token in front. In that order.
Refs
- ProxmoxMCP-Plus — https://github.com/RekklesNA/ProxmoxMCP-Plus
- Model Context Protocol — https://modelcontextprotocol.io/
- Proxmox VE API — https://pve.proxmox.com/pve-docs/api-viewer/
- Proxmox VE user / token management — https://pve.proxmox.com/wiki/User_Management
- Caddy reverse proxy — https://caddyserver.com/docs/